This document outlines the best practices for dealers using the AutoManager and Selly
Automotive CRM/DMS integration.
Please note that if you are not seeing the Automanager button. Then it is possible that the button hasn't been enabled it is possible that the button hasn't been enabled by Selly or by Automanager.
This will also be dependent on the type of system that you are currently using. If Selly is unable to enable that button for you. Then you can contact Automanager in order to have that button enabled.
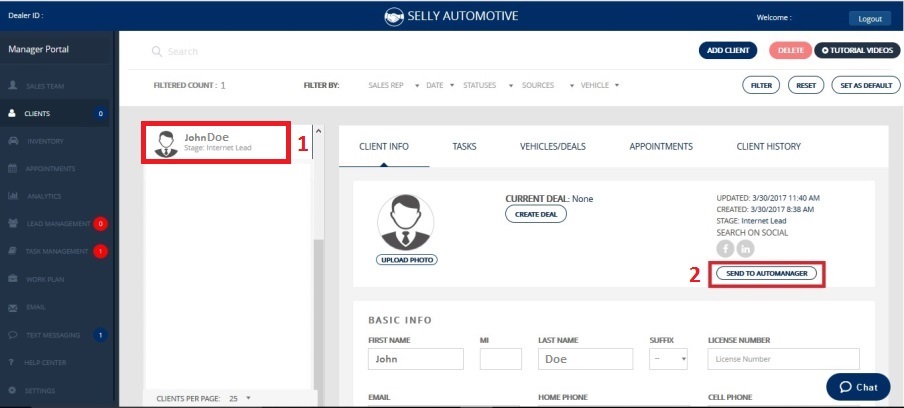
- Starting in Selly Automotive, go over to the Clients module and click on a client that you
want to create a deal in DeskManager for. - Click on the “Send to AutoManager” button near the upper-right corner of the client’s
profile.
- A “success” message will pop up upon successfully sending the client’s information to DeskManager. Now head over to DeskManager.

- Inside of Desk Manager, click on the “Deal/Trade” tab.

- Click on the “New” button on the left side of the screen.

- This will bring up a “Deal and Trade” window. Click on the “Customer” tab.
- Click on the “Prospect List” button.
- This will bring up a “Customer List” window. Click on the “Import” tab.
- Make sure that the “As of” dropdown is set to today’s date. Click on the “Download Contacts”
button at the bottom of the “Customer List” window. - After all clients from Selly are downloaded, select the client you want to start a new Deal for and
then click on the “Select” button. - The Customer List window will close, and the Client’s information will be brought over from Selly to
the “Deal and Trade” window. - Complete the deal normally in DeskManager. On a nightly basis, DeskManager will send the sold deal
back to Selly, where your deal will be completed and marked as Sold. - (Hint): You may directly access the client’s Selly profile by clicking on the “Selly Profile” button.
- A new Selly window will open on the Client’s profile.
0 Comments